

Construction, RC Frame, Structural
Casting a Concrete Staircase: A Step-by-Step Method (with QA & Site Checklists)
Nov
What this guide covers
- Scope, safety, plant & materials
- Reinforcement fixing, nosing templates, and balustrade sleeves
- MEP coordination
- Formwork closing, pre-pour inspection, placing/compaction/finishing
- Striking, curing, minor repairs
- QA/QC inspections, cube sampling & site records
All steps and figures below mirror the project method statement and its attached checklists and drawings.
1) Safety, resources & references
- Mandatory PPE & trained operators. Erect barriers, post multilingual safety boards, ensure valid plant/operator certifications, and provide night lighting where required.
- Materials & plant. Approved rebar, concrete mix, nosing strip, binding wire, shutter-release agent; tower crane/skips as needed.
- Drawings & codes. Work to approved construction drawings, project safety/quality plans, and applicable standards specified in the method statement.
2) Surveying & set-out
A site surveyor sets stair landings and step elevations to the shop drawings using calibrated instruments (total station, theodolite, auto level). Tread/riser dimensions and overall flight geometry must be continuously checked to keep the staircase “on line” and within tolerance.
3) Fixing reinforcement (and embedded items)
- Inspection Requests (IRs). Raise IRs 24 hours in advance for the supervising structural engineer—first for rebar/1st-stage formwork, then pre-pour. Highlight the exact location/level on drawings attached to the IR.
- Rebar placement. Fix bars per bending schedules and drawings; tie tightly at risers to prevent displacement during casting. Provide correct covers and lap lengths.
- Balustrade sleeves. Insert 125 mm-long, Ø40 mm steel pipes within tread reinforcement at 900 mm intervalsfor later balustrade fixing.
- Nosing template. A pre-fabricated timber template (≈10 mm thick × 87 mm wide) is fixed on top of tread bars to match the metal nosing strip; set it to finish flush with the concrete tread.
4) MEP coordination
The JV/site engineer verifies all services against approved builders’ work drawings, raises/clears separate MEP IRs, and confirms embedments do not clash with stair reinforcement/formwork.
5) Formwork closing & final checks
- Clean surfaces. Use an air blower; remove laitance from previous pours; apply release agent strictly per manufacturer data.
- Close formwork. Ensure rigidity and alignment—no “drift” under pour pressure; face/shape/profile must match drawings for a clean finish post-strike.
- Pre-pour IR #2. Confirm grade/class of concrete, access routes, pump/truck logistics, vibrators and emergency lighting/standby gear.
6) Placing, compacting & finishing
- Temperature & slump checks on truck arrival; pour only if in spec. Maintain a controlled delivery sequence per the pour plan so the correct grade reaches each location.
- Compaction. Start immediately after placing; don’t allow cold joints. If delays exceed ~30 minutes, keep the surface “live” and protect from premature set before resuming.
- Finish. Bring surfaces to the specified level/finish per drawings (including tread/riser edges and landings).
7) Striking, nosing & curing
- Strike per schedule. Night-shift pour schedules are handed to day teams/QC to avoid early de-shuttering.
- Nosing strip. After removing the timber template, fix the metal nosing strip permanently with approved self-adhesive; the method statement specifies this sequence explicitly.
- Curing. Apply Masterkure 181 (or approved equivalent) immediately after strike. Maintain curing to prevent shrinkage cracking and surface dusting.
- Minor repairs. Inspect after strike; if defects are found, repair strictly per the approved concrete repair method.
8) Quality control, sampling & records
- Hold-points/inspections. Survey setting-out, reinforcement, formwork alignment, and pour stages are formal inspection points with IRs submitted 24 hours prior.
- Cube testing. Make, cure, transport, and test cubes to BS EN 12390 (Parts 1–3). Typical sample set: 4 cubes per sample (1×7-day, 2×28-day, 1×spare).
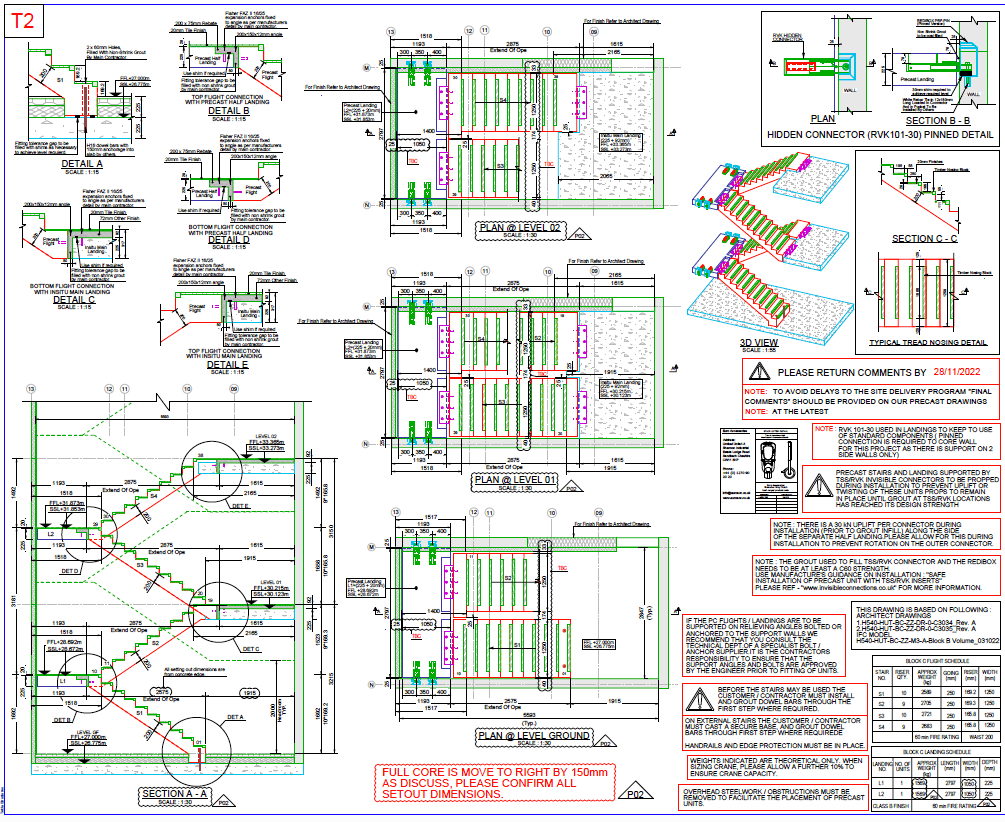
- Site documentation. Use the attached Inspection Request, Check List, Quality Inspection Record, and Concrete Records sheets to log works. Keep the stair nosing formwork detail and isometric drawing (see page 20) on hand for crews.
9) Typical details to brief your team on
- Stair nosing formwork & safety nosing—edge control for consistent riser/tread lines (see drawings, page 20).
- Isometric assembly view—helps visualize rebar, formwork bracing, and landing interface before the pour (also page 20).
FAQs
Why do stair pours need two IRs?
To lock reinforcements/first-stage formwork (displacement-critical) and then the final pre-pour condition (formwork closed, access/logistics confirmed).
Do I really need sleeves for balustrades now?
Yes—retrofitting anchors in hardened edges risks spalling; pre-placing Ø40×125 mm sleeves at 900 mm centers gives clean, durable fixings.
When is curing applied?
Immediately after strike—this method statement specifies a curing compound (Masterkure 181) applied to the staircase surface.